Kindle books are a fun and convenient way to read on the go. They’re also an excellent source of entertainment, whether you’re traveling or sitting at home. But what happens if you want to read your Kindle book on your computer? Or what if you’ve got a new device and need to download some of your old Kindle books onto it? Here’s how!
– You can download Kindle books to your PC by signing in at Amazon.com, going to Your Account > Digital Content and clicking on the “Deliver to” tab. Underneath that is a list of devices where you have permission to send content: choose either “Kindle for PC” or “Amazon Cloud Reader” depending on how you want to read it!
– If you’re downloading onto a tablet like an iPad or Samsung Galaxy Tab S, then this part will be much easier because they usually come with their own apps for purchasing eBooks and reading them. Just sign into iTunes or Google Play store (depending on which device you have) and search for Kindle Books – just make sure book prices are set up correctly before you start downloading.
– For other devices like a Kindle, just make sure to update the software before you start buying books so that it will be compatible with your new device!
This is how you download kindle books onto PC:
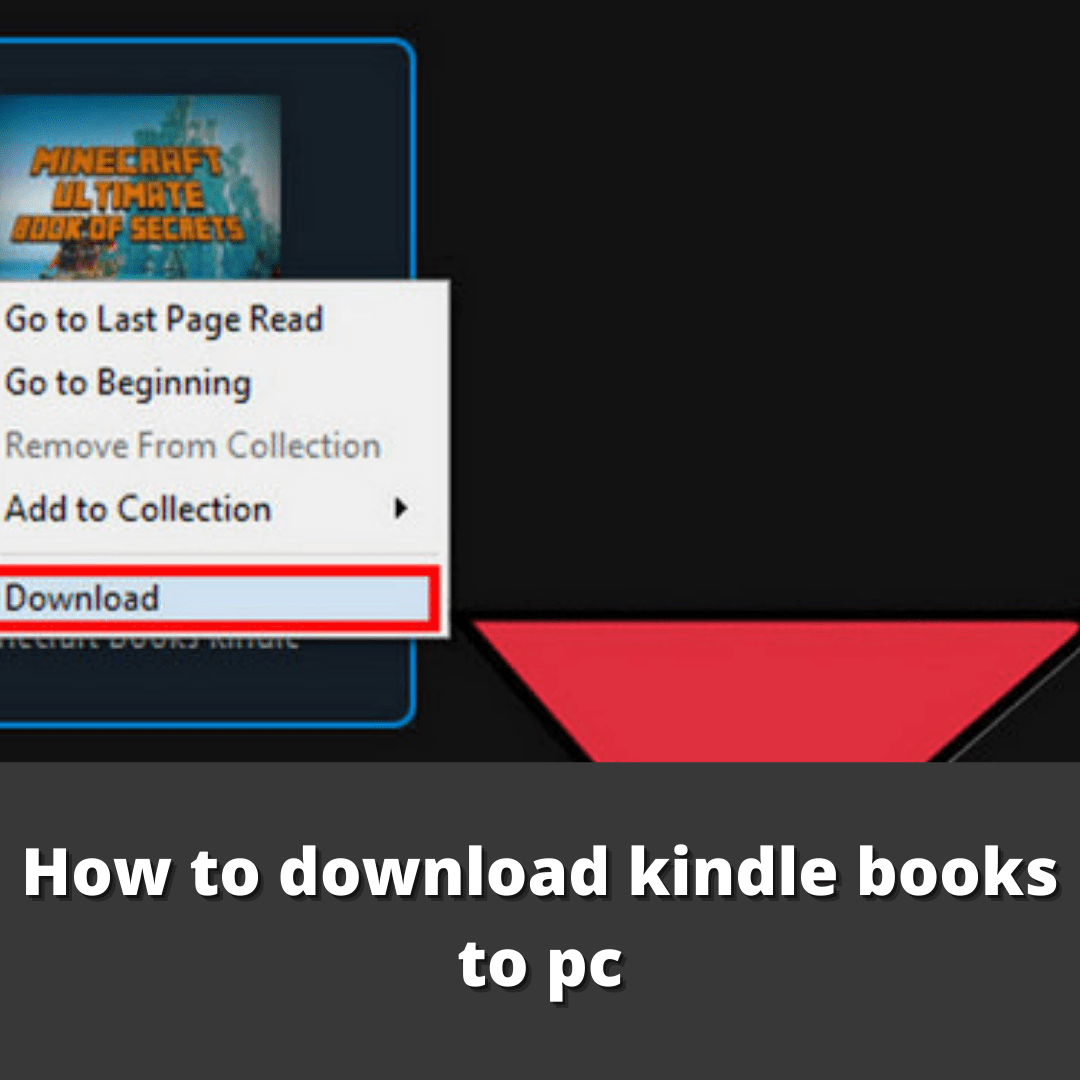
Step One: Go to amazon.com and sign into “Your Account > Digital Content”
Step Two: Once logged in, select the option of either Deliver to “Kindle for PC” or “Amazon Cloud Reader” depending on which way you want to read them. If using an iPad or Samsung Galaxy Tab S then this part should be easier because they both come with their own apps for purchasing eBooks and reading them. Just sign in through iTunes or Google Play store (depending on what device) by searching Kindle Books – then the next time you want to read the book it will automatically be on your iPad or Samsung Galaxy Tab S.
Step Three: Decide how you want to read the book and then click “Download” – the best way is through Kindle for PC because it gives readers a greater variety of features including highlighting, bookmarking, making notes in text, dictionary lookups and more.
– The books are available as MOBI files which can be read by other programs such as Adobe Digital Editions if someone prefers that over Kindle for PC (but not all eBooks work with this program). ) When reading with an app like Amazon Cloud Reader on Android devices there won’t be any options for adding highlights and annotations but they still have some neat features worth mentioning so check out their help articles for more information.
– With the Kindle for PC app, there are a variety of features available that can be found in the “Tools” menu and they include: highlighting texts; adding notes to text; using bookmarks or placeholders to find certain pages later on. The reader also has access to other reading options like dictionary lookups, translations from English into Spanish (or any language) with Google Translate and using Amazon’s X-Ray feature which provides an annotated view of passages by showing how often those words have been used elsewhere in a novel as well as what page they’re located on so readers know where to go next without having to skim through large sections.
Step Four: Add callout points if you want your book to have them!
– Kindle books are compatible with the Amazon Echo and Alexa devices.
– You can also share your favorite passages from a book on Twitter, Facebook or via email to inspire others.
– Find out how many hours of reading you’ve enjoyed in Author Stats at any time by visiting kindle.amazon.com/myreadinglist._
Step Five: Add images for your product’s listing page if it has one! The more the better, but make sure they’re 800x800px each which is required size for our website – larger than that won’t work sadly 🙁 Make sure all images have alt tags as well so screen readers know what’s going on! They should be named something like “Kindle Book Images” or “Product Image” and you can add them by going to the page’s edit screen.
Step Six: Add a product video if possible! If not, don’t worry about it – we’ll have some suggestions for how to get one made in step ten of this guide. 🙂
That’s all from this section! Save your work before moving on or switching screens so that when you come back there will be no worrying 😉 Here are a few other sections where you might want to save: